Docs Menu
- Introduction to Syncloop
- Quick Start Syncloop
-
API Developer Guide
-
middleware
-
pub
- adapter
- authorization
- client
- collection
- date
- docList
- file
- graphQL
- io
- json
- jwt
- math
- platform
- security
- server
- service
- specs
- sql
- string
- bytesToHexString
- bytesToString
- compare
- compareStrings
- concat
- decodeBase64
- decodeHTML
- encodeBase64
- encodeHTML
- equals
- equalsIgnoreCase
- escapeSQL
- fromXML
- htmlDecode
- htmlEncode
- indexOf
- isAlphanumeric
- isBlank
- isDate
- isEmpty
- isNumber
- length
- lookupDict
- maskString
- messageDigest
- messageFormat
- NullOrWhiteSpc
- objectToString
- padLeft
- replace
- rightPad
- stringConcat
- stringIndexOf
- stringToBytes
- subString
- TextArrayToTextString
- TextListCollector
- tokenize
- toLower
- toString
- toUpper
- trim
- urlDecode
- tenant
- util
- xml
-
pub
-
middleware
- User Guide
- FAQs
- Java Docs
- Blogs
SQL Service
Using Syncloop SQL service we can connect with various databases and can not only create various database objects (tables, view, synonyms, indexes, etc) but can also manipulate (Read and Write) data with these objects. When an application or client requests some information (data) to the API, the API redirects the request to the appropriate source and passes the received response to the client. An API is not a database or web server. However, it provides secure access to both using these SQL services.
This is achieved using the following three steps
- Creating a JDBC connection
- Creating an SQL Service
- Invoking SQL Service from API Service
1. Creating a JDBC Connection
JDBC was initially perceived as a client-side API, enabling any Java client to interact with a database. That changed with JDBC 2.0, which included an optional package supporting server-side JDBC connections. Every new JDBC release since then has featured updates to both the client-side package (java.sql) and the server-side package (javax.sql). JDBC 4.3. On the Syncloop API Development Platform, this JDBC Connection is created by using the steps.
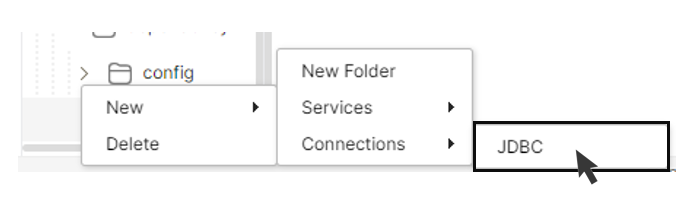
- Right-Click on the package folder and select New 🡪 Connections 🡪 JDBC
- JDBC dialog with appear
- Enter the JDBC name and click on Ok.
- Click on the Connection in Package Explorer which will open an editor and populate the four variables driver, URL, username, and password.
- This populates the connection object which establishes the connection with the remote database.
- Save the connection file.
The description of these variables is shown below:
Driver class: The driver class for the database which has to be accessed.
Connection URL: The connection URL for the MySQL database is JDBC (Java Database Connectivity) which includes the database name, server name (default is localhost), and port number.
Username: The default username for the database. In the case of MySQL database, it is the root.
Password: It is the password given by the user at the time of installing the database. In the case of MySQL database, the default password is the root.
Detailed information regarding JDBC connection for various Databases is shown in the table below.
| Database | Driver Name | Database URL & Example |
| MySQL | com.mysql.jdbc.Driver | jdbc:mysql://<server>:<port>/<databaseName> Example: jdbc:mysql://localhost :3306/myDBName |
| Oracle | oracle.jdbc.driver.OracleDriver | jdbc:oracle:thin:@<server>:<port>:<databaseName> Example: jdbc:oracle:thin:@localhost:1521:xe |
| IBM DB2 App | com.ibm.db2.jdbc.app.DB2Driver | jdbc:db2:<databaseName> Example: jdbc:oracle:thin:@localhost:1521:xe |
| IBM DB2 Net | com.ibm.db2.jdbc.net.DB2Driver | jdbc:db2//<server>:<port>/<databasebName> Example: jdbc:db2://localhost:6789/myDBName |
| Sybase | com.sybase.jdbc.SybDriver | jdbc:sybase:Tds:<server>:<port>/<databaseName> Example: jdbc:sybase:Tds:localhost:4100/myDBName |
| Teradata | com.teradata.jdbc.TeraDriver | jdbc:teradata://<server>/database=<databaseName>,tmode=ANSI,charset=UTF8 Example : jdbc:teradata://localhost /database = myDBName, tmode=ANSI, charset=UTF8 |
| Microsoft SQL Server | com.microsoft.sqlserver .jdbc.SQLServerDriver | jdbc:sqlserver://<server>:<port>;databaseName=<databaseName> Example: jdbc:sqlserver://localhost:1433;databaseName=myDBName |
| Postgre | org.postgresql.Driver | jdbc:postgresql://<server>:<port>/<databaseName> Example: jdbc:postgresql://localhost:5432/myDBName |
| MS Access (JDBC-ODBC Bridge) | sun.jdbc.odbc.JdbcOdbcDriver | jdbc:odbc:Driver={Microsoft Access Driver (*.mdb)};DBQ=<myDBName.mdb>; Example: jdbc:odbc:Driver={Microsoft Access Driver (*.mdb)};DBQ=myDBName.mdb; |
To upload these drivers into the Syncloop API Development platform, the driver file is uploaded as a jar file using the following steps.
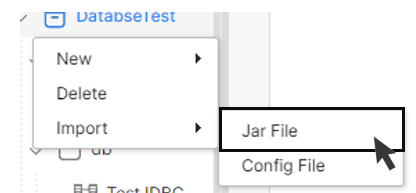
- Right-Click on the Package file a context menu will appear
- Select Import 🡪 Jar File
- Select the Jar file on your computer and upload it.
- A new folder will be created named jars and the driver file will be stored under that.
Note: By default, Syncloop has two preloaded default database drivers that include MySQL and SQL Lite.
2. Creating a SQL Service
After successfully creating the JDBC connection, the next step is to register the connection and also specify the query to access the backend database. The query can be of type
Data Definition Language (DDL): Create, Alter, Drop, Truncate
Data Manipulation Language (DML): Insert, Select, Update, Delete
Data Control Language (DCL): Grant, Revoke
Transaction Control Language (TCL): Savepoint, Commit, Rollback.
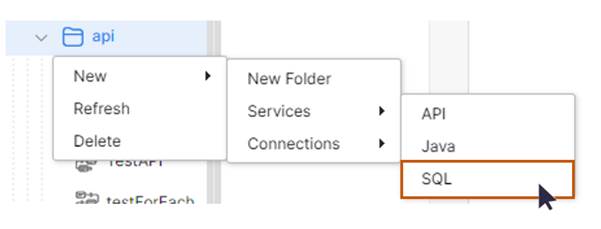
- Right Click on the Package Folder
- A context menu will be displayed
- Select New 🡪 Services 🡪 SQL
- A SQL Service dialog will appear
- Write the name of the service in SQL Name and specify the consumer and developer groups.
- Click on Ok to Confirm
- Click on the service and specify a SQL command.
- Save the file.
The default input/Output parameters that are specified with the SQL service are given below:
inputDocList: This is used to specify the payload. All the input variables that carry data are to be specified under inputDocList.
txConn: It is the connection object.
isTxn: if this is true then only txnConnection can be used.
error: This stores error information of the SQL Service.
Transaction Isolation levels
These define the degree to which a transaction must be isolated from the data modifications made by any other transaction in the database system.
| Transaction Isolation Level | Description |
| TRANSACTION_READ_UNCOMMITTED | Dirty reads, non-repeatable reads, and phantom reads can occur. |
| TRANSACTION_READ_COMMITTED | Dirty reads are prevented; non-repeatable reads and phantom reads can occur. |
| TRANSACTION_REPEATABLE_READ | Dirty reads and non-repeatable reads are prevented; phantom reads can occur. |
| TRANSACTION_SERIALIZABLE | Dirty reads, non-repeatable reads, and phantom reads are prevented. |
A detailed description of these Transaction Levels is provided below
- Read Uncommitted: It is the lowest isolation level wherein one transaction may read not yet committed changes made by other transactions, thereby allowing dirty reads. At this level, transactions are not isolated from each other.
- Read Committed: It guarantees that any data read is committed at the moment it is read. Thus, it does not allow dirty reads and holds a read or write lock on the current row, thus preventing other transactions from reading, updating, or deleting it.
- Repeatable Read: in this, the transaction holds read locks on all rows it references and writes locks on referenced rows for update and delete actions. Since other transactions cannot read, update or delete these rows, consequently it avoids non-repeatable read.
- Serializable: it is the highest isolation level wherein in which concurrently executing transactions appear to be serially executing.
3. Invoking the SQL Service from API Service
This API service is created to call the already created SQL Service to access the database. This service also allows the mapping of various input and output parameters.