Docs Menu
- Introduction to Syncloop
- Quick Start Syncloop
-
API Developer Guide
-
middleware
-
pub
- adapter
- authorization
- client
- collection
- date
- docList
- file
- graphQL
- io
- json
- jwt
- math
- platform
- security
- server
- service
- specs
- sql
- string
- bytesToHexString
- bytesToString
- compare
- compareStrings
- concat
- decodeBase64
- decodeHTML
- encodeBase64
- encodeHTML
- equals
- equalsIgnoreCase
- escapeSQL
- fromXML
- htmlDecode
- htmlEncode
- indexOf
- isAlphanumeric
- isBlank
- isDate
- isEmpty
- isNumber
- length
- lookupDict
- maskString
- messageDigest
- messageFormat
- NullOrWhiteSpc
- objectToString
- padLeft
- replace
- rightPad
- stringConcat
- stringIndexOf
- stringToBytes
- subString
- TextArrayToTextString
- TextListCollector
- tokenize
- toLower
- toString
- toUpper
- trim
- urlDecode
- tenant
- util
- xml
-
pub
-
middleware
- User Guide
- FAQs
- Java Docs
- Blogs
Variables, Datatypes, and Objects
Any service that is created on the Syncloop platform uses input and output parameters for data exchange. The request data variables that are given to the API service are crated in the input section and output variable data provided by the service is received by the output parameters.
Create variables in the Input Section
To create a variable in the input section we right-click on the mouse and we can see an all types of variables can be created.

All the variables/parameters/elements can be created by right-clicking on the input section and selecting the type of variables as shown in the figure above.
Types of variables
| Variable Type | Details |
| Document |
1. Document consists of key values 2. We can create all types of variables under the document 3. Document can be nested. 4. Document accepts these types of values { "key": "value" } 5. Any other object can also be created under the document. |
| String | It stores alphanumeric values including special characters. |
| Integer | It stores integer values. This variable type has minimum and maximum values. |
| Number | This also supports numeric values of both integer and double types. |
| Date | It is considered an object. We can specify incoming and outgoing dates. Date and be internally manipulated. |
| Boolean | The value of Boolean variables is either true or false. |
| Byte | This variable is for binary values. |
| Object | This is used for handling complex data types. It can either be user-defined (custom) or built-in. |
| Form JSON Schema | Here we can insert a sample JSON Schema. It provides the definition of the schema. Once the schema is selected, based on the JSON code the variables are selected. |
| From JSON File | Predefined Objects can be variables, parameters, and elements. |
Create variables in the Output Section
All data variables that are provided by the service as output are created in the output section. They are created as created in the input section.
Converting variables into Array elements.
We can use these above variables as an array by right-clicking it and checking on the checkbox sign
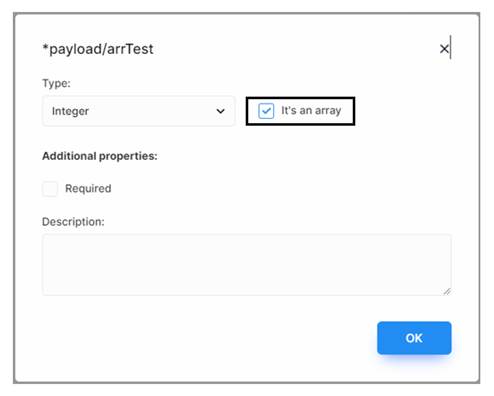
We can have an array of all variables like the array integers as shown above and click on ok button to confirm.
Changing the Variable Type
We can even change the variable type. Right-Click on any variable in input or output section and select properties.

A properties dialog will appear. Click on the Type and change the data type of the variable and click on the OK button.
Making the variable field as required.
We can even change the variable type. Right-Click on any variable in the input or output section and select properties.
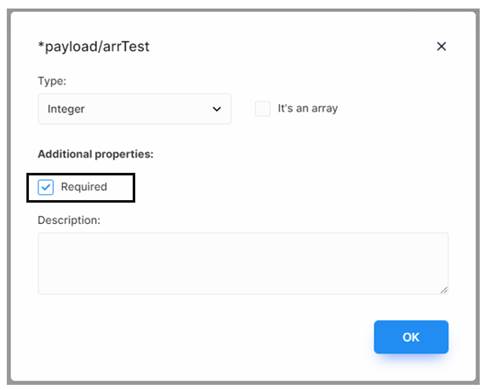
This will make this variable as required.
Adding Validation to the variable
The validation rules can also be added to the variables based on their datatypes.
Let us consider the string variable and if we wish to add validation on the string variable. Right-Click on the variable and select properties. Most of the validations carried out on the different variables are same other than String, Date and Number that could be carried out in a customized manner. The details are provided in the following sections.
String variable
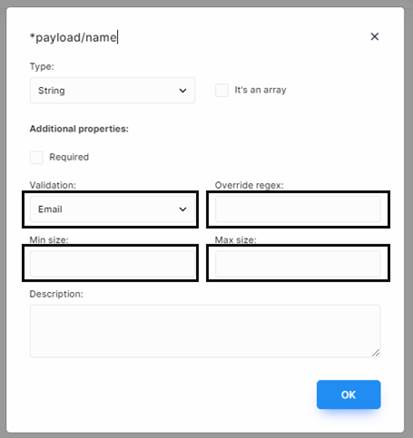
Here validation is done in four ways.
1.Validation: This is done through email and URL. It will ensure that the input string if selected as URL should be URL or otherwise it is an email. If this value is not selected it will take as a normal string.
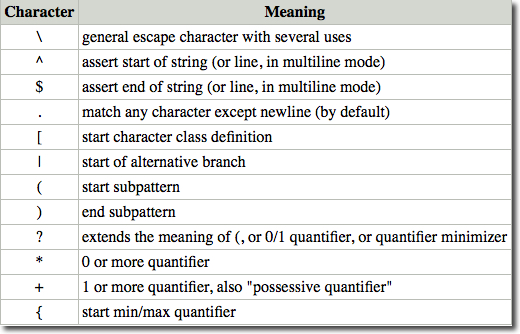
2.Overrise Regex:It uses a regular expression for evaluation and validation. This involves the matching, of strings or texts held by the variable. The character and meaning is given in the table below:
3.Min Size: This validates the string for minimum size. If the min size value is entered then the length of the string has to be greater than or equal to the minimum size. It is a numeric value.
4.Max Size: This validates the string for the maximum size. If the max size value is entered then the length of the string has to be less than or equal to the maximum size. It is a numeric value.
5.Description: The description of the variables can be entered in the description section. It provides information regarding the variables.
2. Number variable
Let us now consider the number variable. The various validation options provided are shown in the figure.
In this case the validation is done three ways
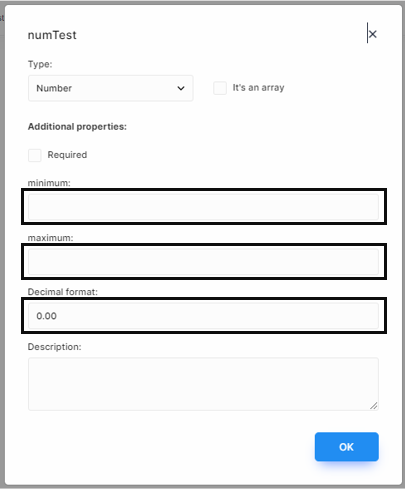
| Minimum: | It allows the minimum value and ensures that the variable should have a value that is greater than or equal to the minimum value. |
| Maximum: | It allows the maximum value and ensures that the variable should have a value that is less than or equal to maximum value. |
| Decimal Format: | It provides the decimal format of the number ie. Places of decimal. |
Date Variable
Let us now consider the date variable. The various validation options provided are shown in the figure. In this case the validation is done in four ways
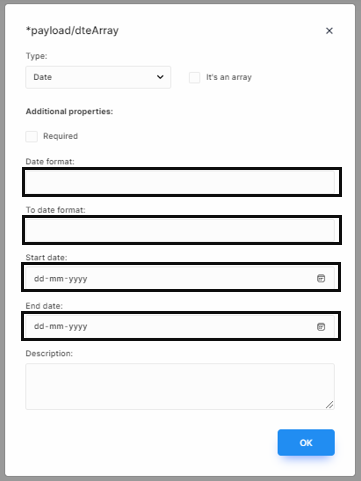
1. Date Format: Specifies the input for the date variable. Eg: Input can be DD-MM-YYYY Format
2. To date Format:This specifies the output of the date variable. For example, the above format can be converted into another date format like YYYY-MM-DD. It can be customized into any other date format.
3. Start Date:The Date entered should be greater than or equal to the start date.
4. End Date:The date entered should be less than or equal to the end date.
Note: The required field will only work when you will enable "Enable validation" in the Configuration dialog box.
To enable it to click on the configuration tool at the top of the workspace.
A Configuration dialog will be displayed. Click on Enable Validation and Click Ok.
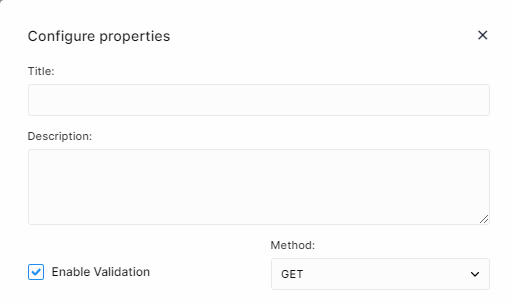
After enabling “Enable Validation” the required field constraint will be enforced on the variables wherever it has been enabled.
Other operations on variables:
In the above sections, we have discussed various types of data types. There are some other operations that can be performed on this datatype which include.
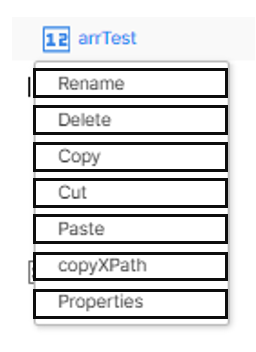
1. Rename It is used to rename the variables.
2. Delete It is used to delete the variable
3. Copy It is used to Copy the variable.
4. Cut
5. Paste: It is used to paste the variables.
6. CopyXPath It provides an absolute path to the variable. It is used to access the variable on the platform.
7. Properties It provides various properties of variables. Different type of variables has different properties. The various properties have already been discussed in the above sections.
Note:
- Variables of any type can be cut, copied, and pasted into various sections of the workspace inside some element and not directly on the root.
- The naming convention followed in the variable is strictly as per Java Programming
- The variables can be dragged and drooped with and outside various sections of the workspace. Input parameters can be dragged and dropped in the output section thus making the output parameters.